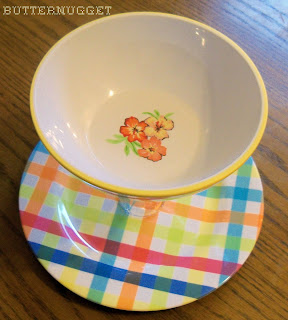
I have had these super cute Melamine plates for a while now. They are so cute and girly, but we I never get to use them because Riley is all boy and tough! Once I saw this tutorial over at Tatertots and Jello, I knew exactly what I would do with my super-cute girly plates.
Make tiered trays out of them!
How did I do it, you ask? It was easy-peasy! Take a look:
To make one tiered tray, you will need
- 2 melamine plates
- 1 candlestick holders
- A pencil
- E-6000 Industrial Strength Adhesive
This stuff right here is the OG of adhesives. It works on any and every thing (as long as you do it correctly, so read and re-read the directions!). And, get this, it is completely water-proof! So that means the new Melamine trays you are going to make will be top-rack dishwasher safe (or at least safe to wash by hand if you are afraid to wash them in the dishwasher.)
*Make sure you read the directions very well and only use E-6000 in a well-ventilated area!*
So gather your cutesy plates and your candlestick holder and let's begin!
Flip your candlestick holder upside down (the bottom/wide part of it should be on the underneath of the top plate). Here I am tracing the top part of the candlestick holder where I want it to be on the bottom plate. Do this for both the top and bottom plate.
Put a thin line of glue just inside where you traced your circle.
And put a thin line of glue around the perimeter of your candlestick holder. (I glued the candlestick holder to the top plate first, but you can do it either way!)
Wait 2-10 minutes for the glue to "set" (my terminology, not sure exactly what word the directions say!), then press the candlestick holder firmly onto the plate.
Repeat the same steps for the other plate.
Then put something heavy on your tiered trays and let them dry in a room temperature, well-ventilated area or room for 24-72 hours (the longer you let it dry, the stronger the bond will be!)
Once the adhesive is dry, figure out what to use your new trays for!
Maybe to hold hair accessories in
To display desserts,such as cupcakes, at your next social gathering or party?
I may use this one to hold cupcakes at Riley's next birthday! (The "1," "2," and "3" are Picnik stickers!)
And the fourth one with the bowl on the top? I was thinking chips and dip! Dip in the bowl and chips on the plate underneath.
Well, there ya go! Told ya it was easy :)
Thanks for stopping by!

Linking to the following:


I really like these.
ReplyDeleteThank you, Alicia! :)
ReplyDelete